DISCLAIMER: The following setup is not supported by Red Hat, even for dev/test/sandbox environments. It is only meant to demonstrate the technical possibilities. See Configuring your cluster for OpenShift Virtualization for information. In addition, Tiny Code Generator (TCG) is not supported or tested by Red Hat.
OpenShift Virtualization is a feature of Red Hat OpenShift Container Platform (OCP) and OpenShift Kubernetes Engine that allows you to run and manage virtual machine workloads alongside container workloads. Based on the open source project KubeVirt, the goal of OpenShift Virtualization is to help enterprises move from a VM-based infrastructure to a Kubernetes-and-container-based stack, one application at a time.
In my previous article, I showed you how to set up and enable OpenShift Virtualization running on Amazon Web Services Elastic Compute Cloud (AWS EC2). In that article, I noted that OpenShift Virtualization looks for hardware virtualization by default, which requires a bare-metal server instance. If you are running OpenShift on AWS EC2, as I do, then you have to enable software emulation over the default hardware virtualization. Otherwise, you need a bare-metal instance from the public cloud provider or a pure bare-metal solution.
In this article, I show you how to switch OpenShift Virtualization from its default of hardware virtualization to QEMU-based software emulation. You will then be able to start and operate a virtual machine through OpenShift Virtualization, even in a non-bare metal instance such as AWS EC2.
Hardware versus software virtualization
By default, OpenShift Virtualization uses the Linux Kernel Virtual Machine (KVM), which is a full-virtualization solution for Linux on x86 hardware. KVM uses the virtualization extensions Intel VT or AMD-V to enable device emulation.
For performance reasons, hardware virtualization, where the virtual machine uses the hardware directly, is almost always preferable over software virtualization in real-world implementations. Modern CPUs, memory, and hardware components are designed with hardware virtualization in mind. However, hardware virtualization is not always available, especially because it requires a bare-metal instance (physical server) to work as opposed to the approach taken by virtual servers that use cloud computing or shared hardware.
As an example, the default AWS EC2 uses KVM for AWS Nitro System-based instance types but does not expose nested virtualization, where one virtualized environment runs inside another one. Unless it is a pure bare-metal server, nested virtualization is a work-around, though OpenShift Virtualization can use the popular open source machine emulator and virtualizer, QEMU with its Tiny Code Generator (TCG) to set this configuration up in AWS EC2.
If you tried to start a virtual machine running on OpenShift on top of AWS EC2 and provisioned with OpenShift Virtualization, using the default hardware emulation in a non-bare-metal instance would fail. In that case, you would see a pod error when you tried to start the new virtual machine, as shown in Figure 1.

The error message in Figure 1 reads, "0/6 nodes are available: 1 insufficient devices.kubevirt.io/vhost-net." Receiving such an error in Red Hat OpenShift usually suggests that you need to adjust your OpenShift resource limits such as the quota, limit-range, or instance-node capacities. With OpenShift Virtualization, the first question you have to ask is whether your OpenShift instance is or is not running on a bare-metal server.
Unless you are able to provision Red Hat OpenShift on a bare-metal instance, this approach is only meant for sandbox and testing environments. Running VMs through OpenShift Virtualization's software emulation method can result in performance degradation—which can be fixed by later switching back to hardware virtualization. Software emulation is the process of artificially executing code intended for a "foreign" architecture and hardware profile by converting it to the assembly language that the CPU in use understands. Luckily for us, KVM provides an easier way to switch to software emulation, based on the popular open source machine emulator and virtualizer, QEMU.
Note: See the difference between virtualization and emulation to better understand the difference between hardware virtualization and software emulation.
Prerequisites
By following the examples in this article, you will learn how to switch your OpenShift container-native virtualization configuration from the default of hardware virtualization to software emulation. All it takes is changing one property field—it really is that easy. To follow the instructions, you must meet the following prerequisites in your development environment:
- Have Red Hat OpenShift 4.4 installed on a non-bare-metal instance like AWS EC2.
- Have OpenShift Virtualization enabled and available in the default namespace,
openshift-cnv.
Note: See my previous article for a guide to enabling OpenShift Virtualization.
Step 1: Locate kubevirt-config in openshift-cnv
Our first step is to locate the ConfigMap called kubevirt-config, which we will use to switch the default hardware virtualization mechanism to software emulation. The kubevirt-config file is located in the default OpenShift Virtualization namespace, openshift-cnv.
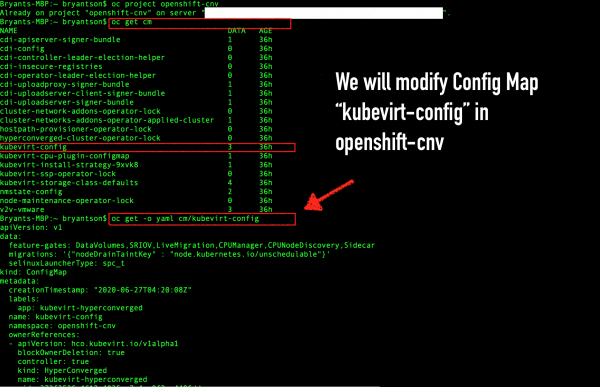
If you are using an OpenShift CLI, open the OpenShift Virtualization project with the command oc project openshift-cnv. Then, use oc get cm to locate kubevirt-config, as shown in Figure 2.

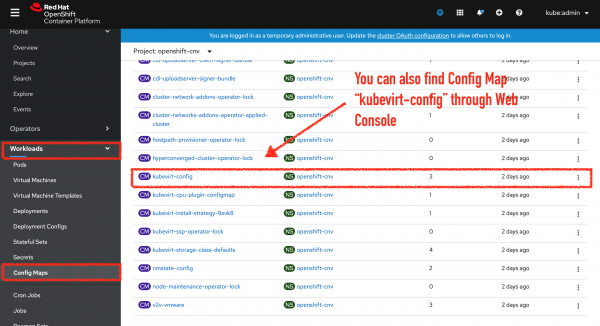
kubevirt-config file.Another option is to use OpenShift's web console to locate the ConfigMap. Make sure that you are in the openshift-cnv namespace, then click Workloads -> Config Map, as shown in Figure 3.

kubevirt-config in OpenShift's web console.Click ConfigMap to view the YAML file for kubevirt-config, which is shown in Figure 4.

kubevirt-config.Step 2: Update the kubevirt-config file for software emulation
Once you locate the kubevirt-config file, all you have to do is to add a new property to the file, instructing OpenShift Virtualization to use software emulation rather than hardware virtualization. If you are using an OpenShift CLI, you can execute oc edit cm/kubevirt-config to edit the ConfigMap, as shown in Figure 5.

oc edit cm kubevirt-config to modify the ConfigMap in the CLI.Once you are inside the ConfigMap's YAML file, add a new property called debug.useEmulation under data, then set the value to true, as shown in Figure 6.

debug.useEmulation.When you are done with these changes, save the file. That's all there to it! The CNV Operator automatically fetches the ConfigMap and applies the change.
Step 3: Start the virtual machine using software emulation
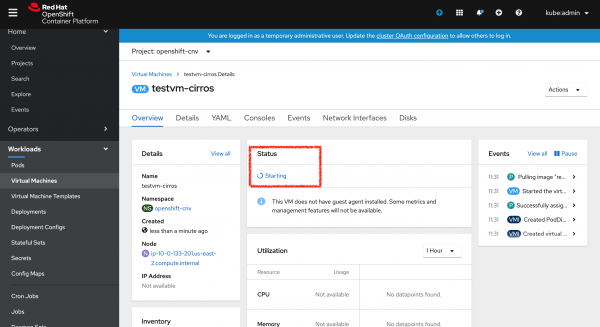
Before we finish, let's test the change to software emulation. Return to the default CNV project namespace and create a new virtual machine. You should not see the previous error; instead, you should see that the VM is starting, as shown in Figure 7.

As shown in Figure 8, the virtual machine's status will change to running.

You can also see that the server has successfully started through the OpenShift web console screen, as shown in Figure 9. Alternatively, you could use KubeVirt's virtctl tool (which I introduced in my previous article) to connect to the VM.

Conclusion
That is it! I hope this discussion and short guide have helped you understand how to switch from OpenShift Virtualization's default of hardware virtualization to QEMU-based software emulation. By following the instructions in this article, you can easily operate a virtual machine with OpenShift Virtualization, even in non-bare metal instances such as AWS EC2.
Last updated: June 4, 2024