In this article, we will showcase one of the potential applications of the Senao Networks SX904 Smart NIC platform by deploying the Fortinet FortiGate-VM next-generation firewall (NGFW) on the card as a uCPE device on the network. We will provide a hands-on example of how the Senao SX904 can be easily integrated into an OpenShift cluster and configured with the Red Hat OpenShift Virtualization Engine and SR-IOV network operator to provide a flexible and highly scalable approach to deploying virtual machine workloads at the edge.
Note, I recommend first checking out Empower your data center with leading compute, networking, and storage solutions to learn more about the solution presented in this article.
Senao SX904 integrated with OpenShift
The integration of the Senao Networks SX904 Smart NIC, based on the Intel NETSEC Accelerator reference design, with the Red Hat OpenShift Container Platform provides an innovative and cost-efficient approach to offload containerized and virtualized workloads.
Traditional bare-metal Customer Premises Equipment (CPE) is typically designed for a single, fixed function, such as routing or firewalling. By deploying virtualized network functions (VNFs) on a white-box networking device, cloud-native customers gain greater flexibility and scalability. This approach defines Universal Customer Premises Equipment (uCPE).
The Senao SX904 is a PCIe-form-factor SmartNIC designed for edge network computing and security applications which provides a range of functionalities typically found in data center servers. We can utilize the Senao SX904 as a stand-alone node in an OpenShift cluster to provide a cost-effective alternative to running workloads on x86 servers. The card is powered by the Intel® Xeon® D processor and has dual-25G Intel® Ethernet E810 controllers integrated into the card which provide support for Single Root I/O Virtualization.
FortiGate VNF, featuring advanced virtual security processing units (vSPUs), overcomes the throughput barrier to provide top performance in private and public clouds. With FortiGate VM, organizations can securely migrate any application and support a variety of use cases, including highly available large-scale virtual private networks (VPNs) in the cloud. FortiGate virtual firewalls (FortiGate-VM) delivers next-generation firewall capabilities with the flexibility to be deployed as next-generation firewall or VPN gateway.
Next we will provide a hands-on example of how the Senao SX904 can be easily integrated into an OpenShift cluster and configured with the OpenShift Virtualization Engine and OpenShift SR-IOV Network Operator to provide a flexible and highly scalable approach to deploying virtual machine workloads at the edge.
Installing SX904 in OpenShift worker node
The SX904 can be deployed in an OpenShift cluster in the same way as any commercial off-the-shelf server. The SX904 includes a baseboard management controller (BMC) that leverages the DMTF Redfish standard for automated installation and provides a built-in web UI with virtual media support (Figure 1).

You can find more information on provisioning the Senao SX904 as a OpenShift node in this knowledge-based article, or by referencing the official OpenShift documentation.
Configuring the cluster for virtual workloads
Once the cluster has been deployed, we can apply the necessary configurations for running virtual network functions. The OpenShift Virtualization operator extends the OpenShift Container Platform, allowing you to host and manage virtualized workloads on the same platform as container-based workloads.
This installation guide provides step-by-step instructions for installing and configuring OpenShift Virtualization Engine on the SX904.
Configuring persistent storage
We can install the OpenShift LVM Storage operator to enable logical volume manager (LVM) storage on an OpenShift Container Platform cluster and configure it to dynamically provision storage for our virtual workloads. LVM for persistent storage is recommended. However, you can use other persistent storage frameworks.
Please consult the official OpenShift Container Platform documentation for a full list of steps for enabling the LVM storage operator in OpenShift. For a basic demonstration on setting up dynamic persistent storage on the Senao SX904, you can reference the previously mentioned installation guide.
Configuring the OpenShift Virtualization operator
The OpenShift Virtualization operator extends the OpenShift Container Platform, allowing you to host and manage virtualized workloads on the same platform as container-based workloads. Please consult the official OpenShift Container Platform documentation for a full list of steps for enabling the OpenShift Virtualization Engine.
For a basic demonstration on configuring OpenShift Virtualization Engine on the Senao SX904, you can reference this article.
Configuring the Senao SX904 SR-IOV devices
The OpenShift SR-IOV network operator allows us to configure the SX904 Intel® Ethernet Controller to provide virtual functions (VFs) devices to our virtual machine workloads.
We can utilize the SR-IOV network operator to configure multiple SriovNetwork Custom Resources to demonstrate a basic network topology around a Fortinet Fortigate-VM. For example, we can define a policy to create VFs on the SX904’s physical ports and define three separate VLAN-tagged networks. Leveraging the SR-IOV capabilities of the Ethernet E810 controllers allows us to support multiple networks within the context of our virtual network function.
Deploying virtual network functions on the SX904
We are now ready to deploy our virtual workloads. The Fortinet FortiGate-VM NGFW provides award-winning protection from a broad array of network threats, and enables enforcement of consistent security policies across private, public, and telco clouds. We will demonstrate a FortiGate-VM deploying on the SX904 to apply some basic policies. However, you can find a more complete reference to the full capabilities of the FortiGate-VM on the FortiGate-VM datasheet and within the Fortinet product listings.
Create a FortiGate-VM container image
- Download the FortiOS QCOW2 image by logging into Fortinet support and downloading the VM. You can find more information on these steps in the official Fortinet documentation.
- Create and upload the FortiOS container image. Create the following Dockerfile in the same directory as the FortiOS qcow2 image. You can find more information on containerized images.
FROM scratch
ADD --chown=107:107 fortios.qcow2 /disk/- Build and push the image to a repository accessible from your OpenShift cluster.
podman build -t <private-repository-address>/fortios:v7.6.0
podman push <private-repository-address>/fortios:v7.6.0
Generate a custom configuration with cloud-init
We will define userData which we can combine with our FortiGate license file to create a MIME-based cloud-init configuration file. This can be a FortiOS configuration file or a backup file taken from a live instance. For this demo, we will stand up a deployment from a backup of a VM we have previously configured. The following are a few note-worthy sections from this file.
system_global:
    admintimeout: 480
    alias: <..>
    gui-auto-upgrade-setup-warning: disable
    hostname: <..>
    timezone: "US/Pacific"

system_interface:
    - port1:
        vdom: "root"
        ip: 10.240.4.99 255.255.255.0
        allowaccess: ping https ssh snmp http telnet fgfm radius-acct probe-response ftm
        type: physical
        snmp-index: 1
        mtu-override: enable
        mtu: 1400

    - port2:
        vdom: "root"
        ip: 10.100.30.1 255.255.255.0
        allowaccess: ping https ssh snmp http telnet fgfm radius-acct probe-response fabric
        type: physical
        device-identification: enable
        lldp-transmission: enable
        role: lan
        snmp-index: 2

    - port3:
        vdom: "root"
        ip: 172.16.1.1 255.255.255.0
        allowaccess: ping https ssh snmp http telnet fgfm radius-acct probe-response fabric
        type: physical
        device-identification: enable
        lldp-transmission: enable
        role: lan
        snmp-index: 3
...
router_static:
    - 2:
        gateway: 10.240.4.10
        distance: 30
        priority: 5
        device: "port1"
...
- Use the write-mime-multipart utility to generate the cloud-init file.
# dnf install cloud-utils
...
Complete!
# write-mime-multipart --h
Usage: write-mime-multipart [options]

Options:
  -h, --help            show this help message and exit
  -o FILE, --output=FILE
                        write output to FILE [default -]
  -z, --gzip            compress output
  -d DEFTYPE, --default=DEFTYPE
                        default mime type [default text/plain]
  --delim=DELIM         delimiter [default :]


# write-mime-multipart -o cloudinit.txt cli-commands.txt license.txt- Create a secret in OpenShift from the contents of the cloud-init file to provide this configuration to the FortiGate VM.
# oc create secret generic forticonfig-fortigate-test --from-file=userdata=cloudinit.txt -n sx904-vms
secret/forticonfig-fortigate-test created
Deploy FortiGate-VM VNF on the Senao SX904
Create a VirtualMachine definition for the FortiGate-VM. Note that we specify an SR-IOV interface corresponding to each of the networks we created in the previous steps.
apiVersion: kubevirt.io/v1
kind: VirtualMachine
metadata:
  name: fortios-02
  namespace: sx904-vms
spec:
  dataVolumeTemplates:
    - apiVersion: cdi.kubevirt.io/v1beta1
      kind: DataVolume
      metadata:
        creationTimestamp: null
        name: fortios-02
      spec:
        source:
          registry:
             secretRef: local-registry-fortios
             url: 'docker://<private-repository-address>/fortios:v7.6.0'
        storage:
          resources:
            requests:
              storage: 30Gi
  running: true
  template:
    metadata:
      labels:
        kubevirt.io/size: small
        kubevirt.io/domain: fortios-02
    spec:
      domain:
        cpu:
          cores: 8
        devices:
          disks:
            - name: rootdisk
              disk:
                bus: virtio
          interfaces:
          - name: default
            macAddress: 02:9b:48:00:10:03
            masquerade: {}
            model: virtio
          - name: management_vlan10
            sriov: {}
            macAddress: '02:23:10:00:00:09'
          - name: trusted_vlan2
            sriov: {}
            macAddress: '02:23:10:00:00:11'
          - name: untrusted_vlan3
            sriov: {}
            macAddress: '02:23:10:00:00:13'
        resources:
          requests:
            memory: 8196M
      networks:
      - name: default
        pod: {}
      - name: management_vlan10
        multus:
          networkName: sriov-sx904-enp244s0f0-vlan10
      - name: trusted_vlan2
        multus:
          networkName: sriov-sx904-enp244s0f0-vlan2
      - name: untrusted_vlan3
        multus:
          networkName: sriov-sx904-enp244s0f1-vlan3
      volumes:
        - name: rootdisk
          dataVolume:
            name: fortios-02
        - name: cloudinitconfig
          cloudInitConfigDrive:
            secretRef:
              name: forticonfig-fortigate-test
Apply the VirtualMachine resource definition to the cluster.
# oc create -f forigate_vm.yaml
virtualmachine/fortios-02 created
We can see the virtual machine has been created in the Virtualization tab in the OpenShift web console (Figure 2).

By default, port1 on the FortiGate-VM will provide us a management interface from which we can access the web console from any machine within our management network (Figure 3).

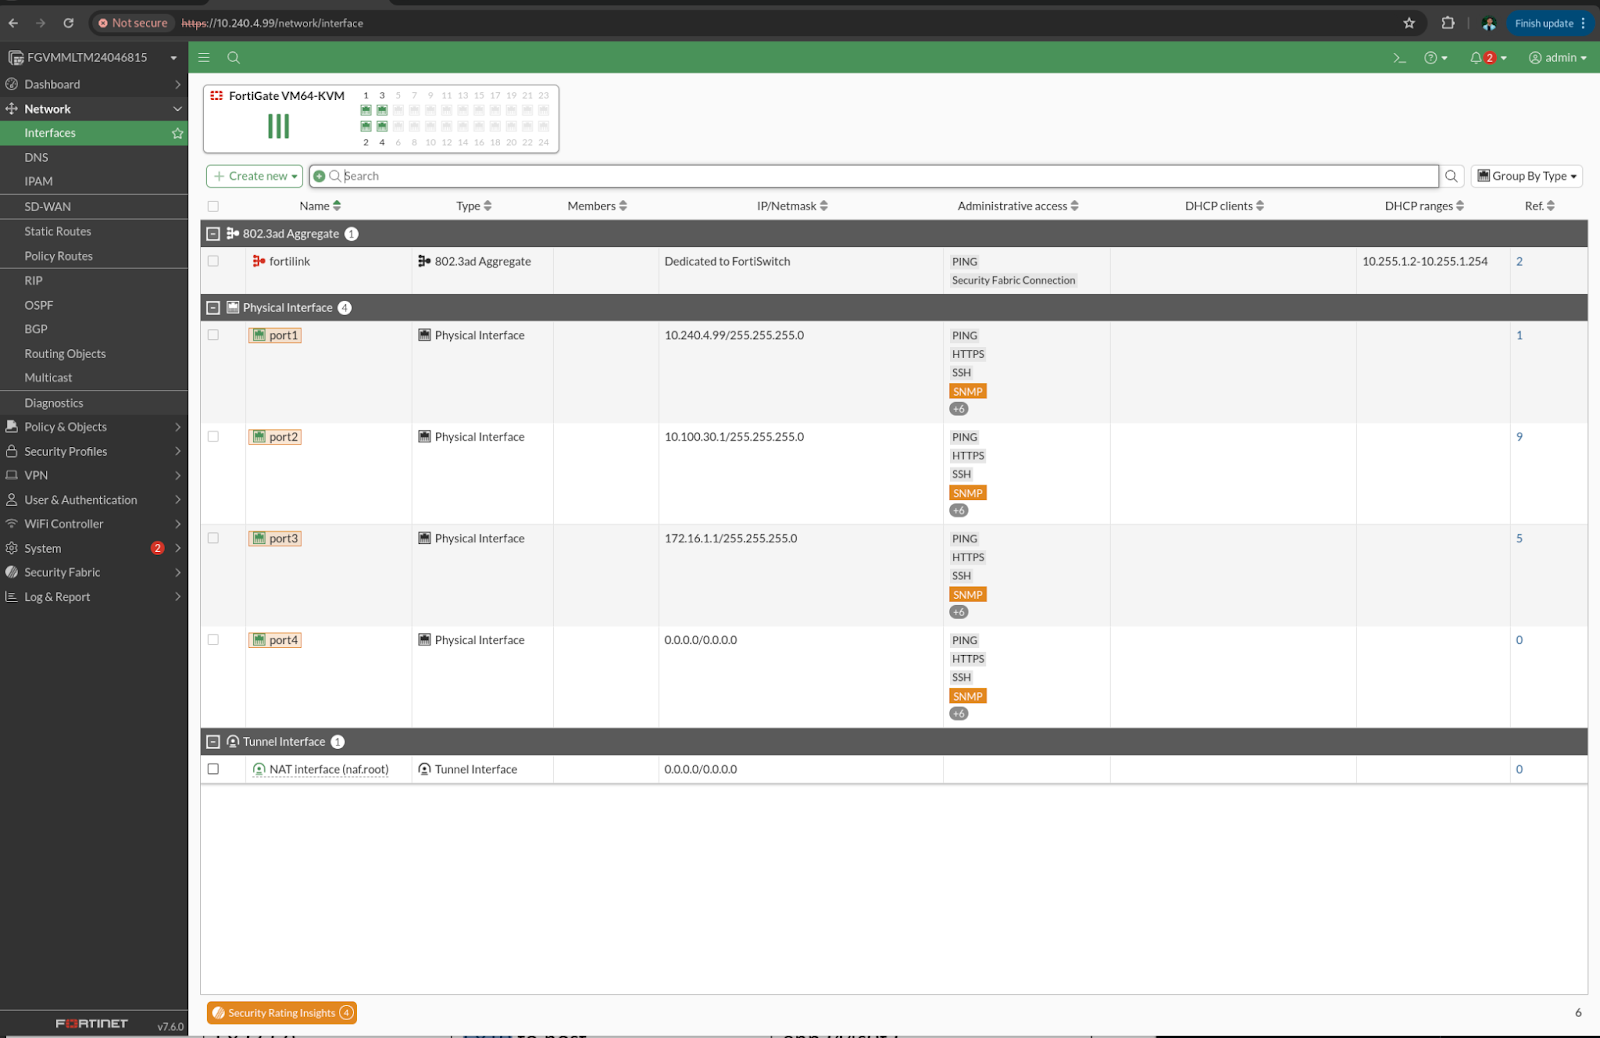
We can see the ports we defined in our cloud-init have been configured in their respective networks (Figure 4).
On the SX904 node, we can see the VFs have been properly plumbed to the respective ports on the FortiGate-VM.
[core@wsfd-advnetlab229-intel-ptl ~]$ ip link
1: lo: <LOOPBACK,UP,LOWER_UP> mtu 65536 qdisc noqueue state UNKNOWN mode DEFAULT group default qlen 1000
    link/loopback 00:00:00:00:00:00 brd 00:00:00:00:00:00
2: enp0s30u1u2: <BROADCAST,MULTICAST,UP,LOWER_UP> mtu 1500 qdisc fq_codel state UNKNOWN mode DEFAULT group default qlen 1000
    link/ether 32:90:52:64:7c:1f brd ff:ff:ff:ff:ff:ff
3: enp2s0: <BROADCAST,MULTICAST,UP,LOWER_UP> mtu 1500 qdisc mq master ovs-system state UP mode DEFAULT group default qlen 1000
    link/ether 88:dc:97:44:ed:3c brd ff:ff:ff:ff:ff:ff
4: enp244s0f0: <BROADCAST,MULTICAST,UP,LOWER_UP> mtu 1500 qdisc mq state UP mode DEFAULT group default qlen 1000
    link/ether 88:dc:97:44:ed:3f brd ff:ff:ff:ff:ff:ff
    vf 0     link/ether 86:27:fb:9b:3f:18 brd ff:ff:ff:ff:ff:ff, spoof checking on, link-state auto, trust off
    vf 1     link/ether 2e:f7:01:08:51:a4 brd ff:ff:ff:ff:ff:ff, spoof checking on, link-state auto, trust off
    vf 2     link/ether 02:23:10:00:00:09 brd ff:ff:ff:ff:ff:ff, vlan 10, spoof checking on, link-state auto, trust off
    vf 3     link/ether 02:9b:48:00:10:03 brd ff:ff:ff:ff:ff:ff, vlan 10, spoof checking on, link-state auto, trust off
    vf 4     link/ether 3a:76:9d:41:e6:fe brd ff:ff:ff:ff:ff:ff, spoof checking on, link-state auto, trust off
    vf 5     link/ether ce:7e:7d:95:fb:0b brd ff:ff:ff:ff:ff:ff, spoof checking on, link-state auto, trust off
    vf 6     link/ether 62:2e:18:4a:cf:69 brd ff:ff:ff:ff:ff:ff, spoof checking on, link-state auto, trust off
    vf 7     link/ether b2:90:26:ec:26:94 brd ff:ff:ff:ff:ff:ff, spoof checking on, link-state auto, trust off
    vf 8     link/ether be:c8:98:60:e8:f7 brd ff:ff:ff:ff:ff:ff, spoof checking on, link-state auto, trust off
    vf 9     link/ether 36:b8:a0:30:02:9c brd ff:ff:ff:ff:ff:ff, spoof checking on, link-state auto, trust off
    vf 10     link/ether da:01:45:17:40:ec brd ff:ff:ff:ff:ff:ff, spoof checking on, link-state auto, trust off
    vf 11     link/ether 02:23:10:00:00:11 brd ff:ff:ff:ff:ff:ff, vlan 2, spoof checking on, link-state auto, trust off
5: enp244s0f1: <BROADCAST,MULTICAST,UP,LOWER_UP> mtu 1500 qdisc mq state UP mode DEFAULT group default qlen 1000
    link/ether 88:dc:97:44:ed:40 brd ff:ff:ff:ff:ff:ff
    vf 0     link/ether 02:23:10:00:00:13 brd ff:ff:ff:ff:ff:ff, vlan 3, spoof checking on, link-state auto, trust off
    vf 1     link/ether d6:d0:aa:d4:15:9f brd ff:ff:ff:ff:ff:ff, spoof checking on, link-state auto, trust off
    vf 2     link/ether 22:f6:4c:cf:14:d4 brd ff:ff:ff:ff:ff:ff, spoof checking on, link-state auto, trust off
    vf 3     link/ether 36:8f:31:a5:6c:76 brd ff:ff:ff:ff:ff:ff, spoof checking on, link-state auto, trust off
    vf 4     link/ether 5a:45:5a:07:60:62 brd ff:ff:ff:ff:ff:ff, spoof checking on, link-state auto, trust off
    vf 5     link/ether da:86:87:5c:f5:e2 brd ff:ff:ff:ff:ff:ff, spoof checking on, link-state auto, trust off
6: enp244s0f2: <BROADCAST,MULTICAST,UP,LOWER_UP> mtu 1500 qdisc mq state UP mode DEFAULT group default qlen 1000
    link/ether 88:dc:97:44:ed:3d brd ff:ff:ff:ff:ff:ff
7: enp244s0f3: <BROADCAST,MULTICAST,UP,LOWER_UP> mtu 1500 qdisc mq state UP mode DEFAULT group default qlen 1000
    link/ether 88:dc:97:44:ed:3e brd ff:ff:ff:ff:ff:ff
We can do a quick experiment to validate that the firewall can do basic layer 3 packet forwarding between subnets. By default from a system on our trusted network, we can reach the port on the FortiGate-VM. But we are unable to reach a system on the untrusted network.
[trusted@10.100.30.2]# traceroute 172.16.1.3
traceroute to 172.16.1.3 (172.16.1.3), 30 hops max, 60 byte packets
 1  10.100.30.1 (10.100.30.1)  0.155 ms  0.136 ms  0.130 ms
 2  * * *
 3  * * *
 4  * * *
...
 29  * * *
 30  * * *
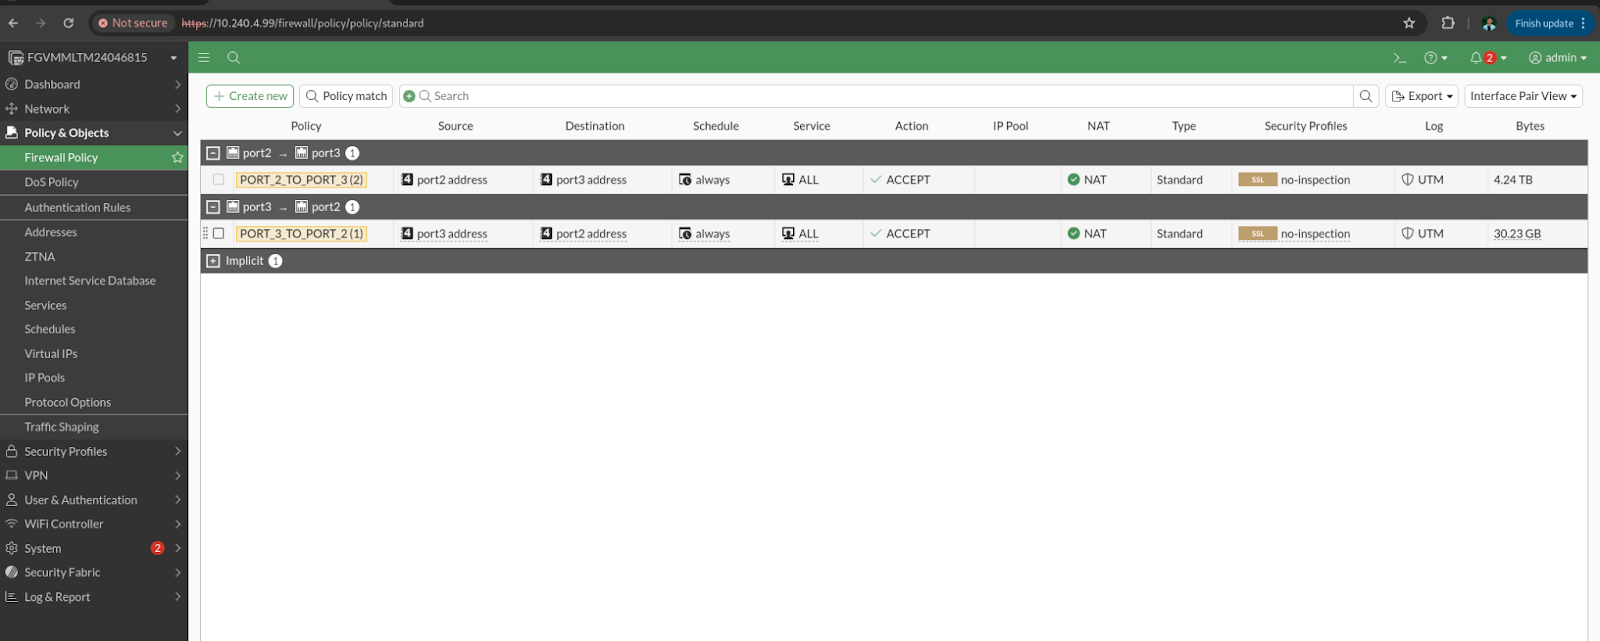
In the FortiGate-VM web UI, we can add basic firewall policy rules to permit this (Figure 5).
[trusted@10.100.30.2]# traceroute 172.16.1.3
traceroute to 172.16.1.3 (172.16.1.3), 30 hops max, 60 byte packets
 1  10.100.30.1 (10.100.30.1)  0.125 ms  0.114 ms  0.108 ms
 2  172.16.1.3 (172.16.1.3)  12.700 ms  12.695 ms  12.690 ms
Final thoughts
With routine configurations, we can utilize the compute resources of the SX904 to demonstrate how this card integrates into a datacenter to offload virtual network function workloads from the host, enhancing overall efficiency and performance. By deploying Fortinet’s FortiGate-VM Next-Generation Firewall as a universal customer premises equipment (uCPE) solution, we showcase how this approach enables a flexible, scalable, and cost-effective alternative to traditional hardware-based network appliances.
The SX904, powered by Red Hat OpenShift and the OpenShift Virtualization Engine, proves to be a powerful platform for running VNFs at the edge while maintaining the agility of a Kubernetes cloud-native infrastructure.
