In a previous article, Why developers should use MicroShift, I explained the benefits of using the Red Hat build of MicroShift for testing Kubernetes applications. MicroShift provides a closer alignment with Red Hat OpenShift than other Kubernetes distributions, such as Kind, and lowers the risk of running into a "it works on my machine" type situation.
This article demonstrates step-by-step how to use MicroShift with CRC, by itself or together with Podman Desktop. I tested the commands and captured screen shots in a Fedora Linux machine, but it should work the same way on Windows and MacOS.
Using MicroShift, CRC, and Podman Desktop
To run the Red Hat build of MicroShift, you need a virtual machine (VM) running Red Hat Enterprise Linux (RHEL). It cannot run as a container yet, and there are no binary packages for Fedora and other community distributions of Linux. Sure, you will be able to run MicroShift from bootc containers, but you’re supposed to deploy bootc containers in a VM or physical machine anyway.
You do not need to be a Red Hat customer to run MicroShift and RHEL. All that is needed is a free account in the Red Hat Developer Program which provides access to resources that used to be available only to Red Hat customers, such as RHEL package updates. The Red Hat Developer Program also enables professionals who work for companies that are Red Hat customers to experiment with and develop using Red Hat products, in a way that is compatible with the Red Hat End User License Agreement.
Running hypervisors and creating VMs may seem like a daunting task for many developers. To be honest, a basic all-defaults installation of RHEL will not support a fully functional installation of MicroShift. You should learn about advanced RHEL features such as Logical Volume Management (LVM) and custom partitioning.
Fortunately, Red Hat OpenShift Local provides an easier way to set up a RHEL VM running MicroShift. OpenShift Local provides a Red Hat build of the CRC project, which in turn provides a simple command-line interface that abstracts the native hypervisor of your desktop operating system, plus ready-to-use VM images with Red Hat OpenShift and Red Hat build of MicroShift.
With CRC, users of Windows, Mac, and different Linux distributions get a VM that is preconfigured to run MicroShift. This allows them to focus on their business and development goals without having to worry about the underlying VM management or RHEL system administration.
For those with an affinity towards graphical tools, the Podman Desktop project offers integration with CRC to create, destroy, and configure such VMs, running either MicroShift or a full OpenShift instance. Podman Desktop is the primary entry point from a user interface perspective for everything related to containers from Red Hat, from local Linux containers to generative AI models. It also provides graphical tools to manage common Kubernetes application resources including Pods, Deployments, and Services.
Use CRC by itself
The CRC community website provides prebuilt archives and installers of CRC for Windows, Mac, and Linux. Whatever download you chose, they provide a single executable named crc, with no dependencies on other packages or dynamic libraries.
Note:
The Red Hat Developer portal and the Red Hat Hybrid Cloud Console provide a Red Hat build of the CRC binaries under the OpenShift Local brand. CRC itself is not a supported Red Hat product as it is a community project. The VM images with Red Hat OpenShift and Red Hat build of MicroShift VM images, provided by OpenShift Local to support the respective CRC presets, do require valid subscriptions for either product, which you can get from the Red Hat Developer Program. You could alternatively use CRC with its OKD preset and require no subscriptions for any Red Hat product.
The first step is to run the CRC installer, or unpack its archive, so that the crc is made available for use. Because the procedure varies depending on your desktop operating system, consult the documentation on the exact process.
You will also need a pull secret for accessing Red Hat registries so that MicroShift can download the required container images. After you log in to Red Hat Developers or to the Red Hat Hybrid Cloud Console using either your Red Hat account or your free Red Hat Developer Program account, you can download this pull secret as a text file.
Configure CRC to run MicroShift
Once the crc binary has been configured locally and your OpenShift pull secret has been retrieved, the following commands configure CRC to create a VM running MicroShift.
First, verify that you have a working crc binary on your command path. Aside from the version, the result of the command provides the version of both OpenShift and MicroShift, which are hardcoded for each release of CRC:
$ crc version
CRC version: 2.46.0+8f40e8
OpenShift version: 4.17.10
MicroShift version: 4.17.10
There are different ways of using the crc command to create and start a VM running MicroShift. In its simplest form, the crc command interactively asks for required configuration parameters. My recommendation is to configure CRC for MicroShift using a series of discrete commands that are scriptable and easier in the long run when integrating additional components, such as Podman Desktop.
$ crc config set preset microshift
To confirm your system is ready, and you have the needed system bundle, please run 'crc setup' before 'crc start'.
$ crc config set pull-secret-file ~/Downloads/pull-secret
Successfully configured pull-secret-file to /home/flozano/Downloads/pull-secret
$ crc config set consent-telemetry yes
Successfully configured consent-telemetry to yes
$ crc setup
...
Your system is correctly setup for using CRC. Use 'crc start' to start the instance
The output of the crc setup command is very detailed and provides useful troubleshooting information in case something goes wrong (such as during the download of the VM image or bundle).
Note that the crc setup command interactively asks for an administrator password, so that it can configure networking on the local host for easy access to MicroShift inside the CRC VM. It assumes that the current user is allowed to escalate privileges using sudo or the native mechanisms of the operating system.
There are other configuration parameters that you can set with crc config (for example, amount of memory, number of virtual CPUs, and disk size for the CRC VM). You can rely on the defaults from its presets, and customize as needed.
Create and start a CRC VM
After CRC is configured, you can create and start the CRC VM with a single command, as follows:
$ crc start
...
INFO Starting Microshift service... [takes around 1min]
INFO Waiting for kube-apiserver availability... [takes around 2min]
INFO Adding microshift context to kubeconfig...
Started the MicroShift cluster.
Use the 'oc' command line interface:
  $ eval $(crc oc-env)
  $ oc COMMAND
The output of the crc start command is also very detailed and ends with instructions to use an OpenShift client binary (oc) that CRC downloads and installs on its cache directory. Feel free to ignore this binary and use the oc and/or kubectl binaries that you may already have installed on your laptop.
Access MicroShift inside a CRC VM
When the crc start command completes, the MicroShift cluster should be up and fully functional. The command also creates or updates your kubeconfig file $HOME/.kube/config to include and set a context named microshift.
The following commands illustrate the configuration that CRC applied to MicroShift. The current user is configured with full cluster administrator privileges system:admin. The machine has been configured to resolve the host name of the CRC VM api.crc.testing. If you use OpenShift Route resources, CRC also configures wildcard DNS resolution for its default route domain *.apps.crc.testing:
$ oc whoami
system:admin
$ oc config current-context
Microshift
$ oc get node
NAME           STATUS   ROLES                      AGE  VERSION
api.crc.testing   Ready control-plane,master,worker   2m25s   v1.30.6
MicroShift is a Cloud Native Computing Foundation (CNCF)-certified, single-node Kubernetes distribution. It only implements a subset of custom OpenShift APIs that are relevant for edge use cases. On the other hand, it does provide a larger number of API resources than a default Kind or MiniKube cluster, because it includes all of the extension points included with OpenShift. To support such APIs, it runs a number of pods to provide ingress controllers, CSI drivers, and networking. Be sure all those pods are ready and running before trying to deploy your application:
$ oc get pod -A
NAMESPACE                           NAME                            READY   STATUS RESTARTS   AGE
openshift-dns                       dns-default-4mzkd               2/2  Running   0       4m36s
openshift-dns                       node-resolver-2jjmg             1/1  Running   0       5m46s
openshift-ingress                   router-default-7f48cfc7d8-ntb5b 1/1  Running   0       5m44s
openshift-multus                    dhcp-daemon-smnmg               1/1  Running   0       5m46s
openshift-multus                    multus-rsp8q                    1/1  Running   0       5m46s
openshift-operator-lifecycle-manager   catalog-operator-cdfb646c7-n7d9x   1/1  Running   0       5m43s
openshift-operator-lifecycle-manager   olm-operator-677899c7c7-t5tqn   1/1  Running   0       5m43s
openshift-ovn-kubernetes            ovnkube-master-v2qjp            4/4  Running   0       5m46s
openshift-ovn-kubernetes            ovnkube-node-dk6kg              1/1  Running   0       5m46s
openshift-service-ca                service-ca-5c5499b46f-ndjvl     1/1  Running   0       5m43s
openshift-storage                   lvms-operator-7f544467bc-twl28  1/1  Running   0       5m47s
openshift-storage                   vg-manager-j59nx                1/1  Running   0       4m26s
$ oc api-resources | wc -l
79
At any time, you can use the crc status command to check the status of the CRC VM, including the state and the current resource utilization, as follows.
$ crc status
CRC VM:               Running
MicroShift:           Running (v4.17.7)
RAM Usage:            4.478GB of 16.1GB
Disk Usage:           1.61GB of 4.09GB (Inside the CRC VM)
Persistent Volume Usage: 0B of 15GB (Allocated)
Cache Usage:          5.507GB
Cache Directory:      /home/flozano/.crc/cache
You may notice that the previous output of the crc status command displays memory usage under the disk usage label and vice versa. This bug was just fixed in a recent CRC release.
At this point, you can do anything that you would typically do with any other Kubernetes cluster, such as creating namespaces, creating service accounts, and deploying applications. Popular OpenShift extensions, such as Security Context Constraints (SCC) and Routes, are enabled in MicroShift, but Projects are not.
Stop and delete a CRC VM
When you’re done with your CRC VM, you can stop it. This will retain the state on disk so that it can be restarted when needed using the crc start command.
$ crc stop
INFO Stopping the instance, this may take a few minutes...
WARN Failed to remove crc contexts from kubeconfig: <nil>
Stopped the instance
With no CRC VM running, the output of crc status is as follows:
$ crc status
Error getting ip: host is not running
If you want to get rid of your CRC VM in order to, for example, start testing something from a clean slate, execute the following:
$ crc delete
Do you want to delete the instance? [y/N]: y
Deleted the instance
The crc delete command does not delete data cached by CRC, such as bundles and configuration settings. It only deletes the VM itself, so the next time you create a CRC VM it is much quicker.
If you need to reset CRC back to an non-configured state, you can run the following:
$ crc cleanup
...
Cleanup finished
The output of crc cleanup is again very detailed, as it reverts the configurations performed during crc config. It also requires you to escalate privileges to a local administrator account.
After clean up, CRC should report it is not configured, as if it was installed fresh.
$ crc status
crc does not seem to be setup correctly, have you run 'crc setup'?
If you wish, you can also delete helper binaries and bundles cached by CRC by deleting the $HOME/.crc directory.
Use CRC from Podman Desktop
Podman Desktop offers the OpenShift Local extension to manage CRC VMs. It currently requires that you configure CRC from the shell before its first usage by the extension. Otherwise, you may end up with an incomplete or corrupted CRC configuration. Be sure to follow the instructions from the previous section, at least to the point you run crc setup successfully.
You can download Podman Desktop installers for Windows and Mac and a tarball for Linux. Linux users can also install Podman Desktop from its flatpack distribution, directly from the Gnome Software application, as shown in Figure 1.

When you first start Podman Desktop, it offers to enable a set of default extensions for its most common features (Figure 2).

The Podman and Composer extensions are not required for use with CRC and MicroShift. However, feel free to include them if desired as they will not consume a significant amount of resources.
Enable the OpenShift Local extension
After you finish setting up Podman Desktop, click the jigsaw icon on the lefthand navigation bar to manage extensions (Figure 3). Then select the Catalog tab. Within this page, you can find the OpenShift Local extension and click the download icon to add it to Podman Desktop.

After installing the OpenShift Local extension, if Podman Desktop cannot find the crc binary in your command path, it shows a grayed out status message on the Podman dashboard page, as depicted in Figure 4.

If Podman Desktop locates the crc binary, it displays a button to initialize and start CRC (Figure 5). Do not click it, unless you already configured CRC using the steps in the previous section.

In the event that an attempt was made to initialize a non-configured CRC from Podman Desktop, the process will fail with a message similar to what is shown in Figure 6.

To recover from a prior failure, you must close your Podman Desktop before proceeding forward. Then use the crc cleanup command and reconfigure CRC from the shell before starting Podman Desktop again and using its OpenShift Local extension.
If you configured CRC previously before attempting to use it from Podman Desktop, it will ask for the desired preset. In our case, we want the MicroShift one. It will ask even if you already configured CRC to use the MicroShift preset. Figure 7 depicts this.

Then, Podman Desktop creates a new CRC VM, or starts the existing instance if available (Figure 8).

After a few seconds, the Podman Desktop dashboard displays a green dot on the OpenShift Local icon, indicating that the CRC VM is running, as shown in Figure 9. Also notice that the status bar at the bottom left displays "microshift" indicating the Kubernetes extension is using the Kubeconfig file created or modified by CRC.

Access MicroShift on CRC from Podman Desktop
You can switch to the Kubernetes page which will automatically connect to MicroShift, using the microshift context set by CRC (Figure 10).
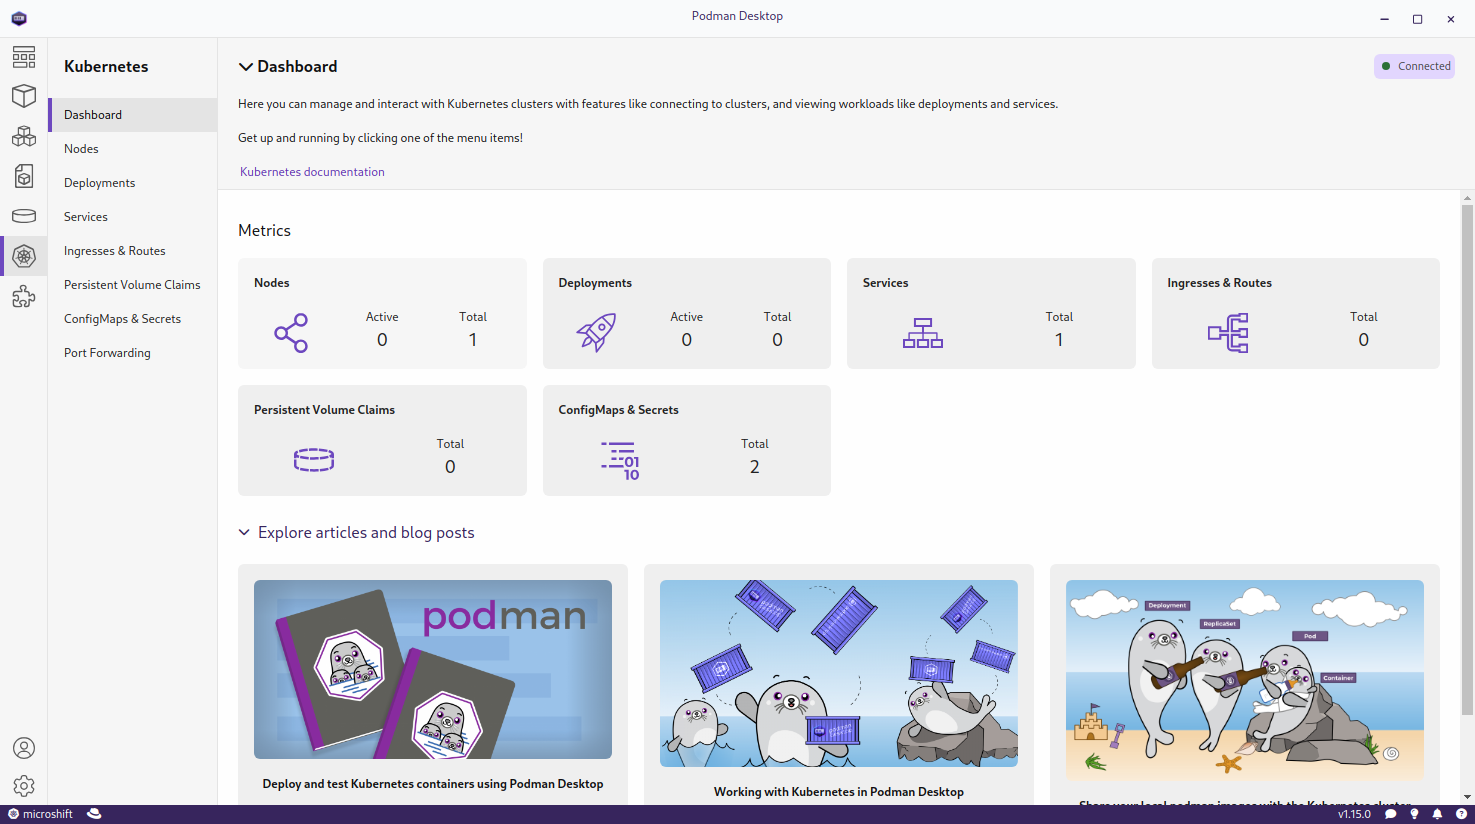
You can switch to other contexts configured within your kubeconfig file to access other OpenShift or Kubernetes clusters. However, Podman Desktop cannot change the namespace set to each context. If you want to use a namespace other than default, you must use the oc or kubectl commands from a shell, to change the context.
Once the desired context has been configured to the desired namespace (and ideally a non-administrator identity), you can use Podman Desktop to create and manage Kubernetes resources, such as Deployments, Services, and ConfigMaps.
A handy feature from Podman Desktop is configuring port-forwarding from your local machine to a Kubernetes pod. This is useful for accessing databases without exposing them to the world using Route resources or load balancer services.
Warning:
The Pods icon and page from Podman Desktop do not manage Kubernetes pods, but Podman pods. Be sure to use the Kubernetes page instead of the Pods page with MicroShift.
Stop and destroy a CRC VM from Podman Desktop
To stop or describe the CRC VM, click the gear icon on the bottom of the left panel to open the Podman Desktop settings page. Then, select Resources. From this page (shown in Figure 11), you can stop, start, destroy, recreate a CRC VM, or switch its preset. Just remember that Podman Desktop refers to CRC by the OpenShift Local branding.
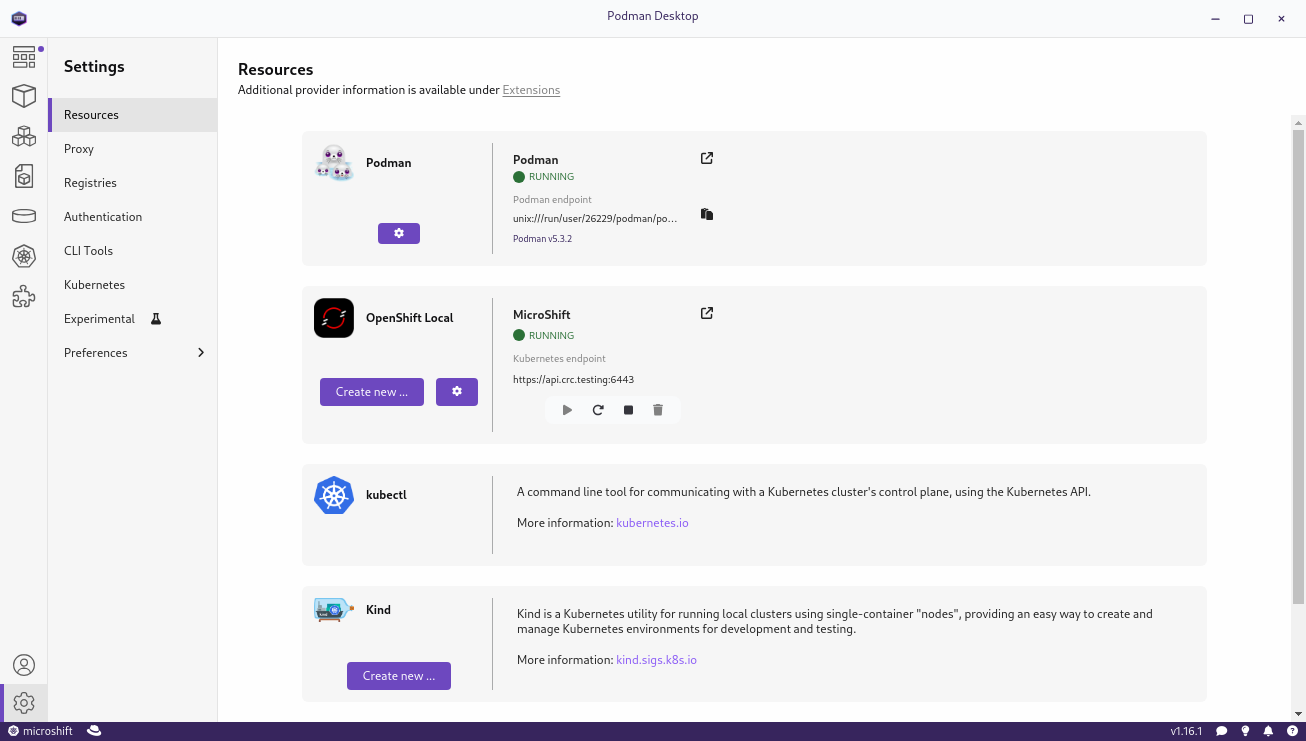
After the initial configuration of CRC has been completed, you do not need to go back to a shell and can manage your CRC VMs entirely from Podman Desktop.
If for some reason you need to reinitialize your Podman Desktop application, such as cleaning the current configuration including data and extensions, you have to delete the user settings directory. On a Linux machine, this is located at ~/.local/share/containers/podman-desktop.
Wrap up
With OpenShift Local, you can create and manage VMs running Red Hat Enterprise Linux (RHEL) and either Red Hat OpenShift or the Red Hat build of MicroShift. OpenShift Local includes CRC, which saves you from having to learn VM management using the native hypervisor of your desktop OS, and also from having to learn how to install OpenShift or RHEL plus MicroShift. CRC also configures your OS networking and Kubeconfig file for easy access to Kubernetes APÌs inside the VM.
Podman Desktop offers a graphical interface to manage CRC VMs to destroy a CRC VM with MicroShift and replace it with a CRC VM running OpenShift. All other features of Podman Desktop related to accessing Kubernetes clusters work with a MicroShift instance from CRC, so you can use its graphical interface to manage Kubernetes API resources to test your applications on your local machine.
With OpenShift Local and Podman Desktop you can focus on our inner loop testing, using MicroShift as a local Kubernetes cluster, with confidence that your applications will work unchanged and securely on Red Hat OpenShift.
Thanks a lot to Andrew Block, Evan Slatis, Gergory Giguashvili, and Praveen Kumar for their review and feedback on drafts of this article.
