Do you need to move a virtual machine (VM) from one hypervisor to another or update the hypervisor version without stopping the VM? Live migration has you covered. The virtio-net failover blog explains how to migrate a virtual machine with a passthrough device via Virtual Function I/O (VFIO) using a standard virtio-net device to redirect the traffic during the migration. However, how does that virtio-net device migrate? What steps does it take to continue the operation on the destination platform transparently to the guest?
This article explores the live migration steps QEMU performs and how it tracks the information it needs to make the process transparent. It explains how QEMU coordinates with vhost-kernel, the device already described in the vhost-net deep dive. I will show how the device can report all the data required for the destination QEMU to continue the device operation. I will also explain how the guest can switch device properties, such as MAC address or number of active queues, and resume the workload seamlessly in the destination.
We'll begin by recapping what virtual migration is and what steps QEMU takes to achieve it. Building on the previous blogs, it will dig deeper into configuring the virtio-net device, how vhost uses the efficient structs already present in QEMU to synchronize the memory changes, and what composes the state of a virtio-net device. Read the previous article in this series for more information.
By the end of the article, you will understand how two different instances of QEMU can resume the workload and device operation, all without guest intervention.
Virtual machine live migration
As stated in previous blogs that explain failover, virtual machine live migration aims to move a virtual machine or guest from one Virtual Machine Manager (VMM) to another. For example, it moves VMs from one QEMU process to another. The destination hypervisor can be on another host, and it could be the next version of the source hypervisor, like going from QEMU version N to N+1. This migration must not halt the guest, hence the "live" part.
There are many use cases for this, from load balancing to source hypervisor maintenance to updating the hypervisor.
This article looks at some of the difficulties facing live migrations and how Red Hat's solution accounts for them.
Migration of the guest memory
Two things need to be migrated, as illustrated in Figure 1: The content of the guest's memory and the state of the devices for the machine. This includes processor information (CPU), network interfaces (NICs), etc. The following sections expand on this. In this context, "state" relates to the condition of the device at a particular point in time.

Depending on the size of the memory and the network bandwidth, the migration can take several seconds or even minutes to finish. As you don't want to stop the VM during the migration, the memory is migrated in an iterative way. In the first round, all the memory is migrated while the system continues to run and use it. A dirty memory page log is used to perform another migration of the memory that has been modified since the last round.
The VM is stopped at some point, and all the remaining memory is migrated. Once complete, the state of the devices is migrated, which is small and quick to finish. The next section explains the device state. Some devices have bigger states, such as Graphic Processing Units (GPUs), which may have multiple graphics assets ranging in size to hundreds of megabytes. Device data can then be migrated iteratively (like the RAM). Assume the virtio-net device state is smaller than one megabit (1Mb) for this discussion.
Migrations, like the one described above, are called pre-copy mode. QEMU can also do post-copy mode, where the guest starts running at the destination while the RAM pages are copied in the background. This mode has unique challenges, such as avoiding the machine accessing pages that have not been copied yet, which is why it is not often used.
Tracking memory writes in vhost devices
Tracking the modified memory in QEMU seems easy as long as the emulated devices dataplane is processed in QEMU. However, examples exist of devices where data is exchanged without QEMU intervention, such as for vhost-kernel or vhost-user. These are out of process (OOP) devices.
If QEMU is not the writer of the guest memory, how can it track the memory that must be updated at the destination? The next sections describe how these devices address guest memory and can talk with it using the virtqueues. We can then understand how this is accomplished.
Handling the device addressing
In the case of vhost-kernel, the kernel process can access the memory of any userland process with functions like copy_to_user and copy_from_user. These can copy data buffers from the userspace in the kernel thread, given its virtual address, and also copy data back from the kernel thread to userland, respectively.
The guest does not know the virtual address of the buffer. The guest places the buffer address in the descriptor using its guest physical addresses (GPA), but it does not know which host virtual address (HVA) corresponds in QEMU. However, vhost-kernel needs to know where the buffer is. QEMU sends the translations at the vhost device start and whenever the guest memory layout changes. Each time the vhost needs to read or write data using the GPA, it will use these translations to locate it.
QEMU sends these translations to the vhost device using the VHOST_SET_MEM_TABLE ioctl. Its argument is an array of {GPA, size, HVA} translations. See Figure 2 for a graphical representation of this process.

After these translations are set, the vhost device reads the GPA of the buffer and translates it accordingly. After that, it can use the aforementioned copy_to_user and copy_from_user.
Understanding the dirty bitmap
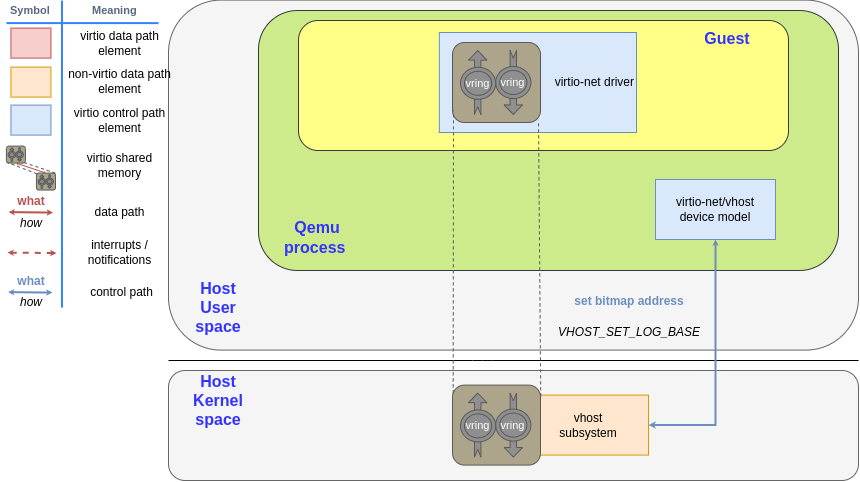
Now you're ready for the last bit (pun intended) needed for tracking the memory writes. Since the vhost device writes directly to the guest memory without communicating with QEMU, how does QEMU know what memory sections it needs to resend?
The answer is to expose the dirty bitmap to vhost. The dirty bitmap is a large array, where each bit represents a guest memory page in GPA units. The memory page size depends on the guest architecture; however, assume an x86 4K bytes page. That means if the device writes to the first byte of guest physical memory, it needs to set the first bit of the bitmap. The bitmap is big enough to represent all GPAs of the device, and if the memory layout changes, the size may be adjusted.
QEMU sets the virtual address (HVA) of the bitmap using the VHOST_SET_LOG_BASE ioctl, as shown in Figure 3. It has the virtual address (HVA) as the first parameter so the kernel can write to it.
Lastly, QEMU instructs the kernel's vhost subsystem to start reporting the dirty memory by setting the VHOST_F_LOG_ALL feature bit using the VHOST_SET_FEATURES ioctl. This is a special feature bit, as it can be set and removed after DRIVER_OK. It is not defined in the standard and probably never will be to maintain compatibility with vhost. See Figure 4.

Every time the device writes to a page, either writing a buffer or updating the used idx, it will also set the corresponding bit in the dirty bitmap.
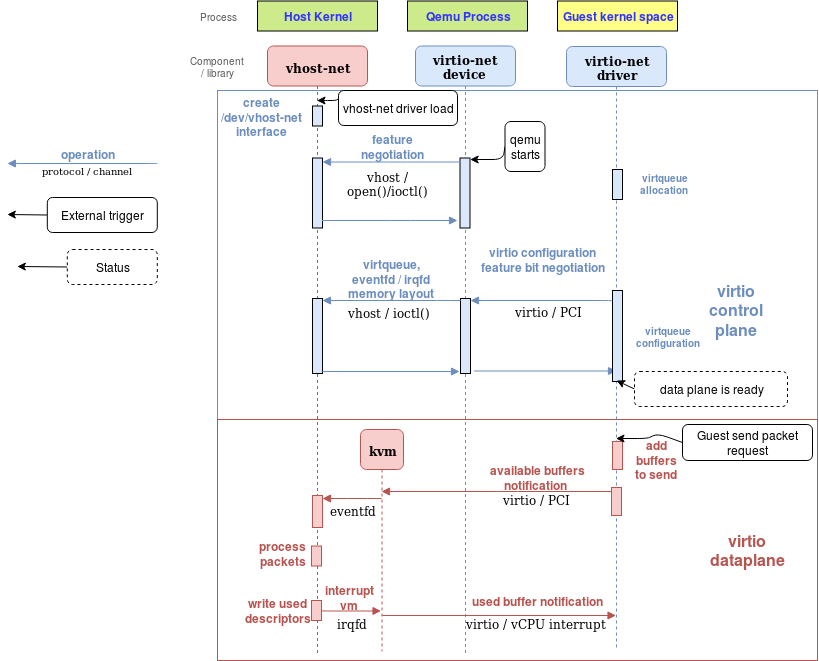
I'll do a full walkthrough. The guest places a descriptor chain, consisting of a first read buffer, followed by a write buffer, and puts the head avail descriptor in the descriptor ring. It increases the avail idx. All of these modifications are notified by Kernel-based Virtual Machine (KVM) to QEMU, since it is not the vhost's responsibility to notify it of those changes. If you feel lost, please review previous blogs in this series that explain the virtqueue dataplane format, such as the split virtqueue and the packed virtqueue articles.
Next, the vhost device notes the increase of the available index. It reads the head id of the descriptor chain and the request of the non-writable descriptor. This is the first step. QEMU is not notified of the reads, as the pages don't need to be resent during the migration. See Figure 5.

Then, it starts writing the device-writable buffer. Assume the write span is three pages, so it would need to write these three bits. The bit index of a given GPA is found by dividing GPA/page_size. These are the second and third steps in the following diagram.
For completeness, the vhost kernel thread and QEMU may run in different CPU threads, so these writes must be synchronized with QEMU cleaning of the dirty bitmap, and this write must be seen strictly after the modifications of the guest memory by the QEMU thread. To do it is slightly more complicated than using copy_to_user, but assume it is done that way for simplicity. See Figure 6.

Finally, the vhost device marks the descriptor as used, so it increments the used_idx. It's actually the same process as writing the buffer content, so I'll reuse the previous diagram and increase the used_idx in the guest memory with step two and write it to the dirty bitmap's bit that represents the one containing the used idx field with step three.
It is the same method KVM uses, although alternatives exist, like the KVM dirty ring. It has advantages, such as improved locality for the communication of changes. It also has disadvantages, like the need to define more actions if the ring gets full.
Note that QEMU waits until the used idx has been updated before stopping the vCPU and migrating the remaining guest RAM. Later sections show a complete example.
Migration of virtio-net device
In the case of a VM live migration with virtio-net, the destination device must be able to continue the work pending by the source, so the guest must not notice this change. In other words, the destination device must be configured so it knows how to continue the operation, without needing configuration by the guest.
I'll list a few examples with a network interface. When the guest resumes, the destination device must know things, such as:
- How to fetch the next packet of each transmission queue to send.
- Where to place the next packet to receive.
- How to handle hardware offload, like MAC or VLAN filtering or queue configuration.
"Device state" is all the information the VMM needs to make it work correctly, such as the configuration or data it might be processing. This state is sent from the source QEMU to the destination in a binary data stream, usually through TCP.
The format of the binary stream is described in QEMU code, such as "the first 6 bytes are the MAC address of the device, the second one is the mac filtering state, the third is a bitmap of a given size describing what VLANs are filtered out." QEMU performs version checking, so it does not send a new state to an old QEMU version. It also supports migrating from previous versions, so the state that was not sent by the earlier version of QEMU will be given a default or signaled it does not exist, etc.
To expand on the state that QEMU needs to transfer to continue the Virtio dataplane operation, refer to previous blogs in this series, such as the ones that explain the split virtqueue and the packed virtqueue format.
However, not all of the state needs to be migrated. Part of it may be redundant, such as pre-fetched descriptors, or particular to a device, such as the link state. To understand better which state is needed, I will expand on the Virtio frontend and backend.
Understanding the Virtio device frontend
The device frontend is the part of the hardware (or emulated hardware) that is presented to the guest operating system running inside the VM. In the case of virtio-net devices, the guest sees a Virtio device, so it can only interact with it using Virtio. You can see more information in previous blogs, like vhost-net deep dive or the journey to vhost-user.
Virtio uses a "transport," usually PCI, to communicate with the guest. The guest can send commands, data, and requests. This part of the device state is the frontend device state (the one the guest can interact with using Virtio). When the guest uses the PCI reads and writes to configure the virtqueues, QEMU intercepts them. QEMU performs changes to its device state so they can be migrated.
In the case of QEMU, command line options specify many frontend properties. For example:
-device virtio-net-pci,rx_queue_size=256,tx_queue_size=256,id=net2,mac=56:48:4f:53:54:01,indirect_desc=off,mtu=9000The example creates a frontend device with the following configuration:
- Transmission and receive queues size of 256 descriptors.
- '56:48:4f:53:54:01' MAC address.
- Disabled indirect descriptors (described in the split virtqueue blog).
- Mtu of 9000.
The list of arguments for the virtio-net device grows as it develops new capabilities. Still, all of them must be migrated to new versions of QEMU.
Understanding the Virtio device backend
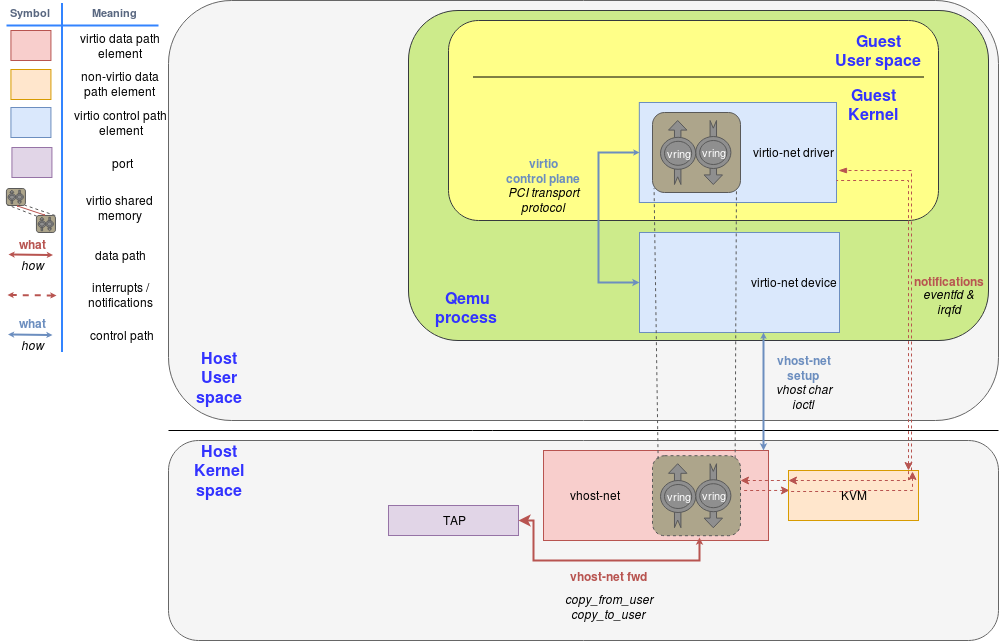
However, QEMU cannot send a packet outside by itself. It needs collaboration from other entities outside of QEMU. In the case of virtio-net, QEMU reads the packet content and then forwards it to the kernel using a tap device. The full process is described in the vhost-net deep dive blog. See Figure 7.

In this scenario, the tap device is the backend. The guest is not aware of it, nor does it care about it. The guest just wants its packets to be sent and it only talks to virtio. It doesn't matter how the hypervisor does it. You can extend the example to receive packets or to exchange buffers with any other kind of virtio device, such as blk or gpu.
The backend is responsible for processing the guest's requests through the frontend. QEMU can pair the frontend device it shows to the guest to whatever backend it needs.
The same blog provides another example of a backend: vhost-kernel. See Figure 8.
In this case, QEMU is not involved in the dataplane communication, as the guest can kick directly to the host kernel and vice-versa. This is called an OOP (out of process) device.
Another example is vhost-user, where the device backend is implemented in another userspace process (as opposed to a kernel context). See Figure 9.

The key point is that QEMU can migrate dynamically between some backends, such as vhost-kernel net and a totally emulated virtio-net device in QEMU. It can also use live migration to do that. The guest is unaware of this change, as QEMU always presents a coherent view to the guest, maintaining all the devices' frontends (Virtio, PCI, etc).
The following command line specifies to QEMU which backend is associated with a given frontend. For example:
-netdev tap,id=hostnet0,vhost=off -device virtio-net-pci,netdev=hostnet0The command means the following: Create a tap device without vhost-kernel support named hostnet0, and pair it with the virtio-net-pci frontend. For completion, when userland creates a tap device, the kernel returns a file descriptor to interact with the tap device. It is also possible to pass an opened file descriptor and forbid the QEMU process from opening more tap devices.
Migrating the Virtio-net state
Almost-static device state
Part of this state is already contained in the QEMU command line, such as the device's MAC address or features like indirect descriptors support. QEMU checks the command line is the same in the migration. Since the guest cannot change them, much of the frontend state is migrated that way.
Other parts of the state are not set in the command line, so they are not fixed for the VM duration. They are, however, relatively static regarding the Virtio device lifetime. These are device and virtqueue configurations, such as features accepted by the guest and virtqueue addresseses or size. They are set by the guest using the transport accesses, usually PCI reads and writes, and they are intercepted by QEMU regardless of whether it uses vhost. The destination QEMU can send these vhost-specific messages to configure the vhost at the destination on resume. Refer to the diagram in Figure 10 from the vhost-net deep dive blog.
Dynamic device state: virtqueue state
Some parts of the state depend on a particular moment in time, such as the queue indexes depending on the time of migration. QEMU needs a way to set the next available descriptor in the destination device. Otherwise, the following situation may happen:
- The guest makes available N descriptors at the source of the migration, so its
avail idxmember in theavail idxis N. - The source device reads M descriptors, so it writes used
idx Min the usedvring. - Now, the migration happens. The destination device reads the
avail idx Nand thinks it needs to process N descriptors. From the guest's perspective, the first N descriptorsidof theavail ringare not available, so the device is just reading or writing garbage. - The device overrides the
used idxas it processes descriptors. Since it has no obligation to read the previousused_idx, it will start from 0 to N. Hopefully, the guest will see either invalid descriptors ids used or that theused idxincreased in bigger steps than thevqsize.
For a detailed explanation about how this happens, refer to the split virtqueue and packed virtqueue format blogs. With packed virtqueue, it needs to migrate the indexes, avail flags, and used flags.
When not using vhost-kernel nor vhost-user, QEMU itself must move avail_idx and used_idx. In this configuration, the source QEMU can send this information easily in the source. The destination QEMU can configure itself to resume the VQ processing. However, this is not true with OOP devices, such as vhost-kernel.
The vhost device exposes messages to set and retrieve the vq index (state). With vhost-kernel, these are VHOST_GET_VRING_BASE and VHOST_SET_VRING_BASE. The next section describes the full workflow.
Dynamic net device state: control virtqueue
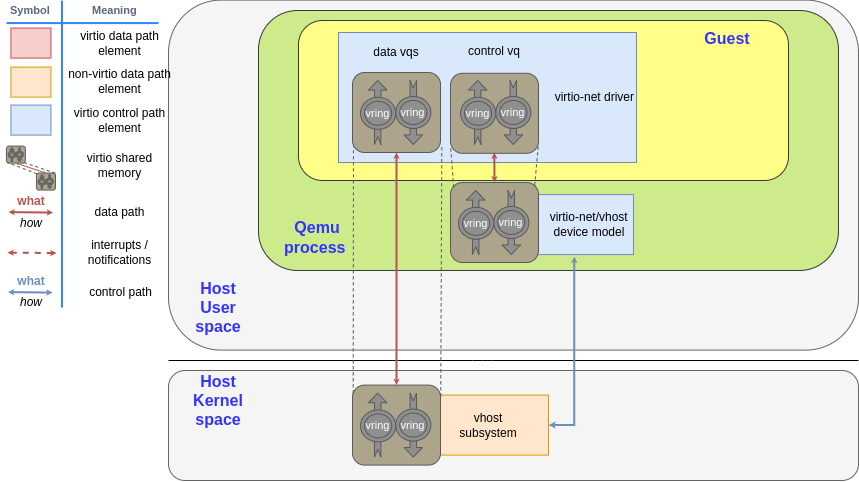
Finally, part of the net device state can be modified many times throughout the device's lifetime. MAC address, VLAN filtering, or the number of data queues may change relatively frequently.
There is a special virtqueue for these commands called the control virtqueue, where the guest can place requests (change MAC address, set these data queue pairs, etc.), and the device confirms or denies them. It is not processed by the vhost kernel but by QEMU itself. This way, QEMU can store the updates in the virtio model.
Completing the migration process
Resuming the workload
I've described how QEMU can track the state of the device, guest RAM changes, etc., while the migration occurs concurrently with the workload. The vCPU and devices run while the source QEMU sends its RAM to the destination.
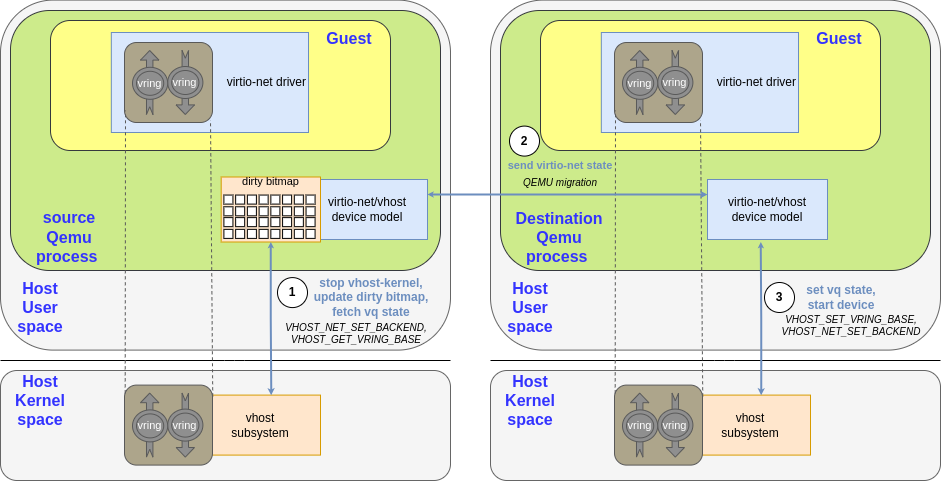
After some time, it must finish the migration and continue the workload. All the vCPUs and devices must be stopped to be sure the destination QEMU has the same state as the source. If the device is 100% emulated, it is easy to stop sending and receiving traffic. In the case of vhost-kernel net, it needs a way to notify vhost-kernel to stop in an ordered manner. This is done using VHOST_NET_SET_BACKEND ioctlbut with a -1 argument instead of the file descriptor of the tap device.
No vhost operation is pending by the return of the syscall, and vhost will not write to the guest memory anymore. After that, each vq state must be fetched so the destination knows how to continue the operation. As described in the Dynamic device state: Virtqueue state section, this is done using VHOST_GET_VRING_BASE. It is step one in the diagram.
Once these steps continue, the backend state is dumped in the emulated device state, so the migration process follows the same pattern. The rest of the RAM is sent to the destination and the virtio-net state afterward with the state of the remaining devices, such as disks, vCPUs, etc. This is step two in the diagram.
As the sending completes, the destination QEMU can continue the workload. This may include starting its own vhost-kernel backend device. For this to work, it needs to first set each vq state with VHOST_SET_VRING_BASE and then set a valid tap device backend file descriptor for each virtqueue pair with VHOST_NET_SET_BACKEND. This is step three in Figure 12.
Advertising the new network topology
Since the VM may be in a different position in the network, it may need to send a gratuitous ARP to update topology changes. While QEMU could do this itself in some circumstances, it is easier to politely ask the guest, as it knows its MAC addresses, VLAN filters, etc., better.
QEMU requests the information by enabling a bit representing a specific field in the virtio-net config space in the network status. It immediately sends a config interrupt change to the guest, instructing it to reread the config space, looking for changes. When the guest reads this bit, it sends the gratuitous ARP packet and acknowledges it to QEMU by sending the VIRTIO_NET_CTRL_ANNOUNCE_ACK control queue command.
Other device changes can be notified through this mechanism, such as when the link toggles the connectivity up or down or changes its ethernet speed.
Wrap up
By this time, all the steps of the live migration have been completed and understood, even with an out-of-QEMU device. The processes were examined in specific units, and almost without realizing it, the migration was complete.
Live migration is a useful capability of virtualized workloads and has multiple use cases. It helps with load balancing, hypervisor updates, redundancy, etc. For it to work well, it must be transparent to the guest so the hypervisor takes all the important steps. However, it gets more complicated by introducing another element, such as out of process devices.
These OOP devices provide multiple advantages, from more security and isolation of the guest requests processing to increased performance. To combine them with LM is a challenge; however, we've succeeded so far. They just need to keep the state updated in QEMU, such as the memory writes, or be able to fetch that status in the final phase of migration, as with the virtqueue indexes. You've already seen part of that device state, as some are processed directly in QEMU.
The article also shows how this mechanism works using the QEMU migration flow already present for 100% emulated devices. This is important since it helps reduce bugs and code duplications, maintaining a single code for most of the process.
As mentioned, vhost-kernel is not the only out of QEMU device. This blog paves the way for the passthrough vhost-vDPA devices, which can do full hardware offloading. These have some unique challenges, but you're closer to starting with them once the migration with pure emulated devices and vhost devices is well understood.
